Introduction
Not all usb sound devices are made the same with respect to latency, and the
difference matters quite a lot if you hope to use your audio interface for
real-time effects.
This post will show two cards with widely varying latency on Linux and Jack,
but many of the concepts apply to other platforms as well.
Latency is not Throughput
It’s easy to find specs associated with audio interfaces that relate to “speed”.
Knowing that your audio interface supports USB3 which can transmit data at
5000mbps won’t help you evaluate latency, though, and throughput isn’t
generally interesting when evaluating an audio interface.
In theory, a high-throughput interface allows you to record more simultaneous
tracks at higher bit-depths and higher-sample rates. Throughput limits were
important in the early days of USB1.1 interfaces, when the 12mpbs of shared
throughput could only support half-a-dozen hardware channels before saturating
the USB1.1 bus. Those concerns are no longer an issue with modern audio
interfaces, though. USB2, USB3, Firewire, Thunderbolt, and PCI all have more
than enough throughput to handle many tens of channels of simultaneous audio at
the highest bit-depths and sample-rates available. Audio manufacturers also
design their interfaces so that you don’t have to think about throughput by
matching channel counts to the available bandwidth. Throughput specs are easy
to advertise, but they just don’t matter for an audio interface.
Round-trip latency is what you need to be concerned about if you intend to use
your audio interface for real-time effects or synthesis. These specs are often
much harder to come by, although some manufacturers like Focusrite do
advertise their best-case measured latency. There is a great deal of variation
in performance with regard to latency, and it varies not just from card to card,
but from computer to computer depending on what operating system you run and
how it’s configured. For some applications (like podcasting) the difference
almost certainly doesn’t matter. For other applications (like real-time effects)
the difference is almost certainly going to be both audible and distracting.
I’m no expert on psychoaccoustics, but my impression (based on reading and
listening) is that ~15ms is a good rule of thumb for when audio latency becomes
distracting. Even among interfaces targeted at musicians, it’s common for audio
interfaces to vary between 5ms and 30ms, which means some of them induce
distracting amounts latency.
Impact of Latency
- Podcasting: Non-musical voice recording can tolerate a relatively large
amount of latency. I haven’t encountered any hardware that isn’t suitable
for this purpose, and I wouldn’t worry about latency if this is your
use-case.
- Real-time Effects: Playing an instrument live, routing the audio
signal into your interface, processing it with plugins, and then
outputting it to headphones/speakers is the most demanding
use-case in terms of latency… and also the most subjective. Some
musicians may not notice 20ms of latency, others might. Even the
same musician might not notice when playing a pad synth with a
soft attack, and then be distracted by the same latency during a
piano part. If your hardware isn’t capable of achieving sub-20ms
latency, it’s likely you’ll hit some situation where someone
notices and is distracted. Not all USB interfaces are capable of
hitting that bar (probably most fail at it).
- Soft-synths: Synthesis has an advantage over real-time effects in
that it is effected only by output latency, and is not effected by
audio input latency. While soft-synths are subject to midi-input
latency when played from an external midi-based controller, that
latency is usually much less than audio input latency. Interfaces
with 25ms-30ms of round-trip latency as measured by jack_iodelay
may still be able to achieve consistently acceptable latency for
soft-synths.
- Multi-Track Music Recording: When overdubbing multiple audio
tracks, you often end up wanting to do soft-synths or real-time
effects, in which case the above advice applies. For more basic
multi-track recording, you can:
- Monitor input directly (many interfaces have a direct/hardware
monitoring switch or dial, or you can use an external mixer).
- Have Jack compensate output timings based on the end-to-end
round-trip latency measured by jack_io_delay. See
the
Ardour Manual and
this
Ardour Community Thread for
details.
USB Latency Chain
ProAudioBlog,
AndroidAuthority
and the LinuxAudio wiki
all have articles that provide solid introductions to the different
places that can introduce latency into the audio path. I’ll provide my own take
below:
| Name |
Latency |
Description |
| Sound Generation |
1ms - 10ms |
Instruments don’t react immediately to producce sound. A synthesizer is likely to have 5ms of latency. Even accoustic instruments have latency. The low-E on a bass guitar vibrates at 41.2Hz, or less than one complete vibration every 2 milliseconds. It must take several milliseconds to excite a recognizeable pitch. |
| Analog Cables and Components |
0ms |
Signals propagate through copper at roughly 2/3rds of the speed of light. It would require over 10 miles of analog cable to introduce a single ms of latency. This will also apply to any purely analog outboard gear you may have, routing signals through a mixer or a compressor won’t affect latency in a detectable way. |
| Digital Outboard Components |
2ms-?ms |
While purely analog outboard components behave like a bunch of analog cable from a latency perspective, digital outboard components behave like a tiny computer with their own buffers that introduce latency. Expect at least several ms of latency from any digital outboard gear. |
| Midi Input Latency |
1ms |
If you’re driving a soft-synth from a midi-controller, you’ll experience midi input latency instead of ADC, OS, and Jack input processing. Midi input latency is generally low compared to audio input latency, often about a millisecond. |
| ADC |
1ms-10ms |
The audio interface must take analog sound from the inputs and convert them to digital data, as well as apply any digital effects or processing. |
| OS Input Processing |
1ms-5ms |
The USB subsystem, the audio driver, and possibly other OS components must process data coming in from the audio interface. |
| Jack Input Processing |
1ms-5ms on a well tuned kernel. |
This is the number that jack and front-ends like Cadence and QJackctl give you. It’s NOT the end-to-end latency of your system. |
| Application Processing |
0ms-?ms |
Any soft-synths, effects plugins, can introduce their own processing delays between when jack delivers audio samples or midi signals to them and when they output their processed audio samples on their output jack port. |
| Jack Output Processing |
1ms-5ms on a well tuned kernel. |
This is the same number described in “Jack Input Processing”. In addition to the delay incurred on input, jack must process the audio on output and incur a second delay. |
| OS Output Processing |
1ms-5ms |
The USB subsystem, audio drivers, and possibly other OS components must process data going out to the audio interface. |
| DAC |
1ms-10ms |
The audio interface must take the output data and convert it to analog signal on the outputs, as well as perform any effects or signal processing. |
| Distance from Speaker |
0ms-10ms |
Sound travels through the air at about 1 foot per millisecond. If you’re wearing headphones, this delay rounds to zero. If you’re 10 feet away from your speakers, sound traveling through the air may be eating up a good chunk of your latency budget. |
The latency chain has some notable properties:
1. There are lots of possible sources of latency, almost any one of which can
completely blow a 15ms latency budget.
2. It’s often difficult to know where in the signal path latency is coming from
or know when latency from multiple components is stacking up to cause a
problem.
3. Confusion about latency sources is made even worse by the fact that few
components advertise or document their latency properties, you almost always
have to measure latency yourself to have any idea what’s going on.
4. Lots of audio software (including Jack and front-ends like Cadence or
QJackCtl) highlight their own latency prominently but tell you nothing about
end-to-end latency. If you’ve ever read a forum post where someone said “My
system has 2ms of latency and its very distracting!” you can be certain
that person is misunderstanding latency reported by their software, has
end-to-end latency of 20ms or more, but has no idea how much or what is
contributing to it.
These challenges combine to ensure that there is an enormous amount of bad
anecdotal advice on the internet about latency.
Listening For Latency
The simplest way to listen for latency is just to play and listen. Somewhere
between 20ms and 75ms of end-to-end latency, you will start to hear and become
distracted by the delay. Use stacatto notes so you can focus on the timing of
the attack.
If you have the ability to mix your “direct” signal and the signal after routing
it through your computer into a set of headphones, this will allow you to detect
latency that may not be distracting (to you) but is perceptible (and therefore
might be distracting to someone you play with if they’re more sensitive). Some
audio interfaces have a built-in dial to mix “direct” (0-latency, 100% analog
signal path from the interface inputs to the headphone outputs) and digital
outputs from your computer. Or if you have an analog mixer with an effects bus
or similar mechanism to route a signal out and back in, you can plug your mic or
instrument into the analog mixer, send it to the computer via the effects bus,
and monitor both signals in the headphones.
The most sensitive mechanism I’ve found to detect latency right at the
threshold of what I’m able to percieve is to sing into a mic. On a zero-latency
analog signal path, or one with less than about 10ms of end-to-end latency, this
sounds “normal” to me. With 25ms of end-to-end latency, it sounds “weird”…
similar to a vocal doubler or phaser effect. Unless you have a pretty good
sense of how your equipment performs this technique probably won’t help you.
Once you recognize the sound, though, it’s a quick and sensitive test to
perform.
Measuring Latency
Focusrite Scarlett 2i2
First let’s verify that Alsa detects the presence of the card by connecting it
via usb and running aplay -l to list all available Alsa devices. Card 0 is my
laptop’s built-in sound-card, and card 1 shows the Scarlett 2i2 plugged in via
USB:
$ aplay -l
**** List of PLAYBACK Hardware Devices ****
card 0: PCH [HDA Intel PCH], device 0: ALC293 Analog [ALC293 Analog]
  Subdevices: 1/1
  Subdevice #0: subdevice #0
card 0: PCH [HDA Intel PCH], device 3: HDMI 0 [HDMI 0]
  Subdevices: 1/1
  Subdevice #0: subdevice #0
card 0: PCH [HDA Intel PCH], device 7: HDMI 1 [HDMI 1]
  Subdevices: 1/1
  Subdevice #0: subdevice #0
card 0: PCH [HDA Intel PCH], device 8: HDMI 2 [HDMI 2]
  Subdevices: 1/1
  Subdevice #0: subdevice #0
card 1: USB [Scarlett 2i2 USB], device 0: USB Audio [USB Audio]
  Subdevices: 1/1
  Subdevice #0: subdevice #0
In order to measure audio latency, we must:
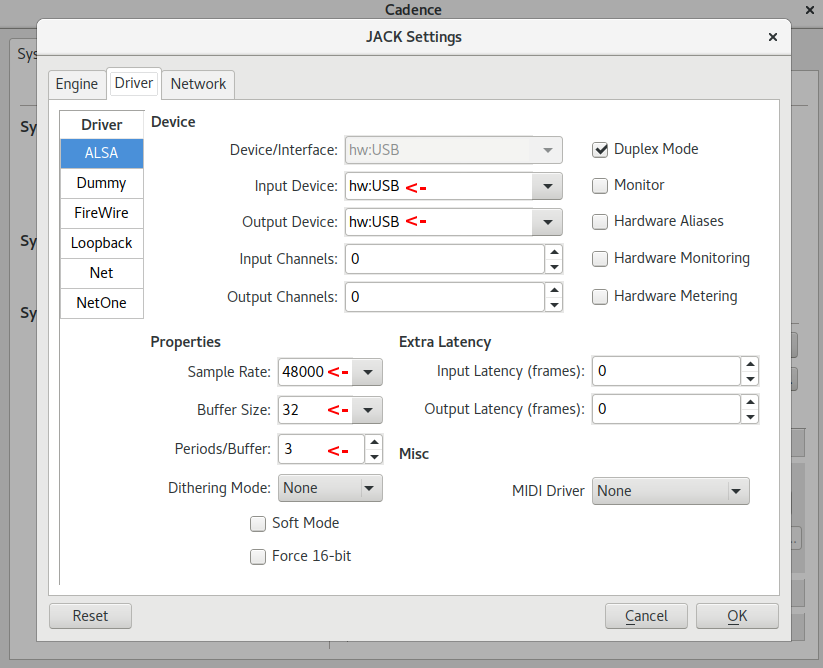
- Configure jack. You can do this via the
jackd command-line tool,
qjackctl, or cadence. All the options are reasonable, but I tend to use
cadence. After starting it and clicking configure, my settings look
like the screenshot above.
hw:USB is the name by which Jack knows the Scarlett- The
Sample Rate, Buffer Size (which is confusingly named
in cadence since it sets the period size not the buffer size
and is called frames/period in other programs), and
Periods/Buffer indicate that Jack itself will take 2ms to
process incoming audio and an additional 2ms to process
outgoing audio… so 4ms of total latency coming from Jack
itself.
- Click
start in cadence to start up Jack. With these settings I do
see periodic xruns every 10 or 20 minutes. This may be approaching the
limits of the hardware’s ability to deliver data on-time, or my Linux
instance may need futher tuning to process the data on-time. The
occasional xruns are not distracting in practice sessions, though.
- Physically connect the left output on the Scarlett to input 1 on the
Scarlett using a quarter-inch cable. This will allow jack_iodelay to measure
it’s own output once we wire things up in Jack.
- In a terminal, run
jack_iodelay.
- Start
catia, which will let us wire up the Jack routes.
- Maximize
catia and select Canvas -> Zoom -> Auto-Fit if the various
ports are scrolled off-screen or are otherwise difficult to read.
- Connect
capture_1 to jack_iodelay’s input, and connect
jack_iodelay’s output to playback_1. In conjunction with our physical
cable from step-2, we now have a closed loop that let’s jack_iodelay
analyze the signal it’s generating to see how long it takes to complete
the loop.
Back in the terminal window, jack_iodelay will now have some useful output:
$ jack_iodelay
new capture latency: [0, 0]
new playback latency: [0, 0]
Signal below threshold...
Signal below threshold...
< repeated many times while we wire up the connections in catia >
new capture latency: [32, 32]
   417.637 frames      8.701 ms total roundtrip latency
        extra loopback latency: 289 frames
        use 144 for the backend arguments -I and -O
< repeated endlessly until jack_iodelay is killed via Ctrl-c >
Lexicon Omega
Again, let’s verify that Alsa is detecting the card correctly with aplay:
$ aplay -l
**** List of PLAYBACK Hardware Devices ****
card 0: PCH [HDA Intel PCH], device 0: ALC293 Analog [ALC293 Analog]
  Subdevices: 1/1
  Subdevice #0: subdevice #0
card 0: PCH [HDA Intel PCH], device 3: HDMI 0 [HDMI 0]
  Subdevices: 1/1
  Subdevice #0: subdevice #0
card 0: PCH [HDA Intel PCH], device 7: HDMI 1 [HDMI 1]
  Subdevices: 1/1
  Subdevice #0: subdevice #0
card 0: PCH [HDA Intel PCH], device 8: HDMI 2 [HDMI 2]
  Subdevices: 1/1
  Subdevice #0: subdevice #0
card 1: Omega [Lexicon Omega], device 0: USB Audio [USB Audio]
  Subdevices: 1/1
  Subdevice #0: subdevice #0
card 1: Omega [Lexicon Omega], device 1: USB Audio [USB Audio #1]
  Subdevices: 1/1
  Subdevice #0: subdevice #0
Again test latency by:
- Configuring
jackd via cadence. After selecting the appropriate device,
This time jack refuses to start with a Buffer Size (aka frames/period)
of 32. I get excessive xruns at 64, so have to bump all the way up to 128.
Jack itself now adds 16ms of latency to the signal. Start jack.
- Physically connect the Omega’s left output to to its Line-1 input, and use
the Omega’s hardware channel-selection button to assign Line-1/Line-2 to
input 1 and input 2 seen by
jackd.
- Start
jack_iodelay.
- In
catia, wire up capture_1 to the input on jack_iodelay, and wire
up the output from jack_iodelay to playback_1
± % jack_iodelay                                                                                                                                                                                             !8112
new capture latency: [0, 0]
new playback latency: [0, 0]
Signal below threshold...
Signal below threshold...
< repeated many times while we wire up the connections in catia >
new playback latency: [384, 384]
  1132.755 frames     23.599 ms total roundtrip latency
        extra loopback latency: 620 frames
        use 310 for the backend arguments -I and -O
< repeated endlessly until jack_iodelay is killed via Ctrl-c >
Analyzing Latency Measurements
- Previous reading had lead me to believe that there was approximately 10ms
of unavoidable latency from ADC, DAC, and USB/alsa drivers. Apparently this
isn’t always the case. For the Scarlett, The roundtrip latency is 8.7ms,
of which
jackd accounts for 4ms. This means that the ADC, DAC, and OS
latency can’t total more than 4.7ms, half of what I had previously thought
possible.
- The Scarlett is an excellent result, and shows that USB audio interfaces
can achieve latency well below the threshold of perception and even approach
latency expected from dedicated digital audio devices like hardware synths
and digital effects boxes, which I believe tend to run between 2ms and 6ms.
- Not all usb audio interfaces achieve acceptable latency, and latency
measurements on the internet are often wrong. Be wary of latency
measurements that don’t specify how they were made, and try to test
hardware on your own computer if your latency requirements are strict.
Introduction
I have a Lenovo Thinkpad t460p laptop that currently runs Ubuntu 17.04. In
general the system is a pleasure to use but one niggle has been mildly
infuriating… the touchpad regularly engages when I’m typing and my cursor
jumps to an unwanted position mid-word. It doesn’t happen frequently enough to
be a serious problem, but it does happen frequently enough to be intensely
irritating. The fix was simple, but researching it was not.
The Fix
Stop using the synaptics driver and start using libinput. For me this was as
simple as running aptitude remove xserver-xorg-input-synaptics and rebooting.
Since your system may not be configured exactly as mine was, details follow
so you can gain a better sense of what might be going on with your own system.
The Hardware
The Thinkpad t460p includes both a touchpad and a pointing stick.

These show up as separate input devices under X11:
$ xinput
⎡ Virtual core pointer                          id=2    [master pointer  (3)]
⎜   ↳ Virtual core XTEST pointer                id=4    [slave  pointer  (2)]
⎜   ↳ SynPS/2 Synaptics TouchPad                id=12   [slave  pointer  (2)]
⎜   ↳ TPPS/2 IBM TrackPoint                     id=13   [slave  pointer  (2)]
[... more output truncated...]
The Drivers
There are multiple drivers potentially in play here. By default the synaptics
driver is installed via the xserver-xorg-input-synaptics package, and the
libinput driver is also installed by default via the
xserver-xorg-input-synaptics package:
$ sudo aptitude search xserver-xorg-input | egrep 'synaptics|libinput'
i  xserver-xorg-input-libinput - X.Org X server -- libinput input driver
p  xserver-xorg-input-libinput:i386 - X.Org X server -- libinput input driver
p  xserver-xorg-input-libinput-dev - X.Org X server -- libinput input driver (development headers)
i  xserver-xorg-input-synaptics - Synaptics TouchPad driver for X.Org server
p  xserver-xorg-input-synaptics:i386 - Synaptics TouchPad driver for X.Org server
p  xserver-xorg-input-synaptics-dev - Synaptics TouchPad driver for X.Org server (development headers)
The synaptics driver takes precedence over the libinput driver for the
SynPS/2 Synaptics Touchpad device. This can be confirmed by looking at
detailed information for the SynPS/2 Synaptics Touchpad device using the id
12 that we got in our previous xinput command. We can see that the Synaptics
driver is in use because each of the properties in the list is prefixed by that
driver name:
$ xinput list-props 12
Device 'SynPS/2 Synaptics TouchPad':
        Device Enabled:         1
        Synaptics Edges:                1632, 5312, 1575, 4281
        Synaptics Finger:               25, 30, 256
[... more output truncated...]
The libinput driver is working, though, and is in use by the pointer stick,
as we can see by noting the libinput prefix on all the properties associated
with id 13 (the TPPS/2 IBM TrackPoint from out initial xinput command).
$ xinput list-props 13
Device 'TPPS/2 IBM TrackPoint':
        Device Enabled (141):   1
        Coordinate Transformation Matrix (143): 1.000000, 0.000000, 0.000000, 0.000000, 1.000000, 0.000000, 0.000000, 0.000000, 1.000000
        libinput Accel Speed (284):     0.000000
        libinput Accel Speed Default (285):     0.000000
[... more output truncated...]
Synaptics and PalmDetect
One of commonly suggested approaches to address touchpad jumpiness while typing
is the palm detection feature of the Synaptics driver. This can be configured
either via synclient as described in the Arch Linux Wiki for
Synaptics,
via xinput set-prop, or by editing the xorg config in a file like
/etc/X11/xorg.conf.d/50-synaptics.conf.
Enabling PalmDetect had no noticeable impact for me. I didn’t dig enough
to determine if the feature was actually broken on my hardware, or if it just
addresses a different problem. My palms don’t actually rest on the pad when I
type, but the plastic of the laptop case flexes enough that the touchpad
interprets it as input. It may be that PalmDetect is correctly detecting
that no palm is resting on the trackpad and so allows the bad input though.
Synaptics and syndaemon
A second commonly suggested approach to erroneous touchpad input while typing
is syndaemon. Syndaemon monitors xorg for keyboard activity (either by polling
frequently or via the more efficient XRecord interface), and when activity is
detected it briefly disables the touchpad by doing something roughly equivalent to
xinput set-prop 12 "Device Enabled" 0. The
Arch Wiki for Synaptics
has advice on configuring syndaemon, or it can be added to your Gnome startup
applications to run as your normal user on Gnome login.
Syndaemon also had no effect for me. It appears that in systems with multiple
pointers, syndaemon only attempts to disable the first device. This issue is
reported and confirmed in
Ubuntu 1591699.
In that bug report, the first pointing device was a “ghost” and could be
disabled manually. In my case, there are legitimately two pointing devices
present and I use them both, I don’t want to disable either of them. It appears
that if you have two pointing devices and your touchpad doesn’t have the lowest
xinput id, there is no way to configure syndaemon to supress input from the
correct device.
Libinput is a library
that handles input devices (both keyboard and pointer devices) for Wayland, but
as we found in our drivers section above, libinput is installed by default and
works for xorg systems as well. Libinput has a
disable-while-typing feature built in and enabled by default.
I was able to activate libinput for my Synaptics touchpad simply by uninstalling
the synaptics driver and rebooting. The libinput DWT feature began working
immediately and my pointer became inactive while I was typing. Problem solved!
The synaptics driver also has features to divide the touchpad area into sections
that trigger different buttons, and by default the right-half triggers a
right-click when depressed. Libinput uses the whole touchpad for left-clicking,
which is better behavior in my opinion. For right-clicks I use the
hardware-button just above the trackpad.
It is allegedly possible to configure the synaptics driver to
disable the right-click area
but I never tried this myself as libinput has all the behaviors I want.
Other Useful Links
Note that the Thinkpad t460p’s touchpad acts as a hardware button, physically
clicking when the pad is depressed. Both libinput howto’s above talk about how
to enable the Tapping feature, which is not necessary for that hardware button
to function. I suspect you only need the Tapping option if you want light taps
to register as clicks, which seems unnecessary and undesirable for this
hardware.
Introduction
I recently changed the way I manage the handful of personal servers that I
maintain. I was previously using Chef to provision containers on LXC. I’ve
recently switched over to a combination of Ansible and Docker. So far, I’m happy
with the switch. Going through the process, I feel like I’ve learned something
about what each technology does well. The TLDR is:
- Chef remains my favorite system for high-volume high-complexity configuration
management work. Dependency management, test tooling, and the comfort and
power of the language are all exceptional. But Chef itself is not
low-maintenance, and the overhead of keeping a development environment
functional dwarfs the “real” work when you have just a few hours of
infrastructure automation to do each month.
- The Ansible ecosystem is slightly less capable than Chef’s in almost every
way, or at least I like using it less. It’s still really really good,
though. It’s also simple to set up and never breaks. If you only do a little
infrastructure automation, Ansible’s simplicity is ideal. If you do grow to
have a very complex environment, Ansible will scale with you. I might be
slightly happier managing many tens or a few hundred cookbooks in Chef, but
I could certainly get the same job done in Ansible.
- Dockerfiles are a massive step backward from both Ansible and Chef in every
way. Most of the work done in Dockerfiles is so trivial that sloppy bash and
sed for text-replacement is good enough, but it’s not good. I’ve found images
on Docker Hub to do everything I want to so far, but when I need to write a
nontrivial Dockerfile I’ll probably
investigate ansible-container,
or just use Ansible in my Dockerfile by installing it, running it in
local-mode, and removing it in a single layer.
- Though I don’t like the Docker tools for building complex images, I do like
that it encourages (requires?) you to be much more rigorous about managing
persisent state in volumes. For me Docker’s primary draw is that it helps
me succeed at separating my persistent state from my software and config.
Read on for the details.
Your Mileage May Vary
I’m not advocating my own workflow or toolset for anyone else. I’m working in a
toy environment, but my experiences might help inform your choices even if
your needs are fairly different than mine.
My Environment
I’m doing all this to manage a handful of systems:
- A single physical machine in my house that runs half a dozen services.
- The Linode instance running this webserver.
- Whatever physical, virtual, or cloud lab boxes I might be toying with at the
minute.
It’s fairly ridiculous overkill for a personal network, but it gives me
a chance to try out ideas in a real, if small, environment.
From LXC
When I was using LXC, I used it only on the physical box running multiple
services, not the Linode or lab boxes. Because the physical box ran a bunch of
different services, I wanted to isolate them and stop worrying about an OS
upgrade or library version upgrade from one service breaking a different
service. I chose LXC rather than Xen or VirtualBox because I was memory
constrained and LXC containers shared memory more efficiently than “real”
virtualization. I didn’t have to allocate memory for each service statically
up-front, each container used only what it needed when it needed it. But each
container was a “fat” operating system running multiple processes, with a
full-blown init-system, SSH, syslog, and all the ancillary services you’d expect
to be running on physical hardware or in a VM.
LXC did it’s job smoothly and caused me no problems, but I found I wasn’t any
less nervous to do upgrades than before I had split my services into
containers. Although my deployment and configuration process was automated, data
backup and restore was as much of a hassle as it had always been. And in many
cases, I didn’t even really know where services were storing their data, so I
had no idea if I was going to have a problem until I tried the upgrade.
LXC does have a mechanism to mount external volumes, but it was manual in my
workflow. And my experience with LXC plugins for Chef Provisioning and Vagrant
was that they weren’t terribly mature. I didn’t want to try to attempt
automating volume configuration in LXC, which set me thinking about
alternatives.
To Docker
Docker has great volume support and tons of tooling to automate it, so I figured
I’d try migrating.
I was able to find existing images
on Docker Hub for all the services I wanted
to run. The Dockerfiles used to build these images didn’t leave a great
impression compared to the community Chef cookbooks they were replacing. They
were much less flexible, exposing many fewer options. The build processes
hardcoded tons of assumptions that seem like they’ll make maintenance of the
Dockerfile flaky and brittle in the face of upstream changes. But they do
work and they seem to be actively maintained. When an image failed to set the
environment up as I desired, I was generally able to hack an entrypoint
shellscript to fix things up as I desired on container startup. Where
configuration options weren’t exposed, I was generally able to override the
config-file(s) entirely by mounting them as volumes. It all feels pretty hacky,
but each individual hack is simple enough to document in a 2 or 3 line comment,
and the number of them is manageable.
By trading off the elegance of my Chef cookbooks for the tire fire of
shell scripts defining each container, I’ve gained confidence that my data as
well as my configs will be available in each container after upgrade. I’ve
already killed and recreated my containers dozens of times in the process of
setting them up, and expect to be able to do upgrades and downgrades for each
container independently with the minimum necessary hassle.
From Chef
When I was using Chef, I used it manage all my systems. I used it to set up LXC
on my container host, to manage the services running inside of each LXC
container, to set up the web-service on my Linode, as well as to manage whatever
ephemeral lab boxes I was messing with at the moment.
To launch a new service in an LXC container, I would manually launch a new LXC
container running a minimal Ubuntu base-image. At the time, the tools I tried
using to automated LXC generally had missing features, were unreliable, or
both… so I stuck to the bundled command-line interface. Each container would
have its own ip-address and DNS name, which I would add to
my Chef Provisioning cookbooks as a
managed host to deploy my software and configs to the container over SSH. Chef
Provisioning would run a wrapper-cookbook specific each node that:
- Called out to a base-cookbook to set up users, ssh, and other things that
were consistent across all my systems.
- Generally called out to some community cookbook to install and configure the
service.
- Overrode variables to control the behavior of the above cookbooks, and did
whatever small tweaks weren’t already covered.
I used Berkshelf manage cookbook
dependencies, which is a fantastic system modeled closely on
Ruby’s bundler gem tool, and both tools have a powerful
and flexible approach to dependency management.
The custom-cookbooks that I wrote had extensive testing to let me iterate on
them quickly:
- rubocop ran in milliseconds and ensured
that any Ruby glue code in my system was syntactically valid and reasonably
well styled.
- Foodcritic similarly ran in milliseconds and
ensured that my cookbooks were syntactically valid Chef code and reasonably
well styled.
- Chefspec unit tests ran in seconds and
helped me iterate quickly to catch a large fraction of logic bugs.
- test-kitchen and serverspec
ran my cookbooks on real machines to provide slow feedback about the
end-to-end behavior of my cookbooks in a real environment.
- guard to automatically ran the appropriate
tests whenever I saved changes to a source file.
When everything was working, I was able to iterate my cookbooks quickly, catch
most errors without having to wait for slow runs against real hardware, enjoy
writing Chef/ruby code, and have a lot of confidence in my deploys when I
pushed changes to my “real” systems. The problem was, everything almost never
worked. Every time I upgraded anything in my Chef development environment,
something broke that took hours to fix, usually multiple somethings:
- Upgrading gems inevitably resulted in an arcane error that required reading
the source code of at least 2 gems to debug. I ended up maintaining personal
patches for 6 different gems at one point or another.
- ChefSpec tests regularly failed when I upgraded Chef, gems, or community
cookbooks. Again, the errors were often difficult to interpret and required
reading upstream source-code to debug (though the fixes were always
mechanically simple once I understood them). I really like the idea of
ChefSpec providing fast feedback on logic errors, but on balance, I
definitely spent more time debugging synthetic problems that had no
real-world implication than I spent catching “real” problems with ChefSpec.
- Using LXC targets with test-kitchen was amazingly fast and memory efficient,
but also amazingly brittle. The LXC plugin for test-kitchen didn’t reliably
work, so I ended up using test-kitchen to drive vagrant to drive LXC. This
setup was unreasonably complicated and frequently broke on upgrades. This
pain was largely self-inflicted, test-kitchen can be simple and reliable when
run with more popular backends, but it was frustrating nonetheless.
- It’s idiomatic in Chef to store each cookbook in it’s own independent git
repo (this makes sharing simpler at large scale). Gem versions, cookbook
versions, and test configs are stored in various configuration files in the
cookbook repository. This meant each upgrade cycle had to be performed
separately for each cookbook, testing at each step to see what broke during
the upgrade. Even when it went well, the boilerplate for this process was
cumbersome, and it rarely went well.
- Chef Provisioning was another self-imposed pain-point. Chef provisioning over
SSH has been reliable for me, but it’s overkill for my basic use-case. When I
started with it, it was very new and I thought I’d be learning an
up-and-coming system that would later be useful at work. In fact, it never
got a huge user-base and I switched to a job that doesn’t involve Chef at
all. It ended up being a bunch of complexity and boilerplate code that could
have easily been accomplished with Chef’s built-in
knife tool.
ChefDK can help with a lot of these problems, but I always found that I wanted
to use something that wasn’t in it, so I either had to maintain two ruby
environments or hack up the SDK install, so I tended to avoid it and manage my
own environments, which probably caused me more pain than necessary in the long
run. When I found something that didn’t work in the ChefDK, I probably should
have just decided not to do things that way.
But regardless of whether you use the ChefDK or not, the cost of these problems
amortizes well over a large team working on infrastructure automation problems
all day long. One person periodically does the work of upgrading, they fix
problems, lock versions in source control, and push changes to all your
cookbooks. The whole team silently benefits from their work, and also benefits
from the ability to iterate quickly on a well-tested library of Cookbooks. When
I was working with Chef/Ruby professionally, the overhead of this setup felt
tiny and things I learned were relevant to my work. Now that I’m not using
Chef/Ruby at work, every problem is mine to solve and it feels like a massive
time sink. The iteration speed never pays off because I’m only hacking Chef a
few hours a month. It became hugely painful.
To Ansible
Although I migrated many of my services to Docker, I haven’t gone
all-in. Minimally, I still need to configure Docker itself on my physical Docker
host. And more generally, I’m not yet convinced that I’ll want to use Docker for
everything I do. For these problems, I’ve decided to use Ansible.
In most ways, this is a worse-is-better transition.
- Ansible Galaxy seems less mature than Berkshelf for managing role
dependencies, and the best practice workflow certainly seem less
well-documented (do you check in downloaded roles, or download them on-demand
using requirements.yml, what’s the process for updating roles in each case?).
- Standard practices around testing Ansible roles seem way less mature compared
to what I’m used to in the Chef community, and seem mostly limited to running
a handful of asserts in the role and running the role in a VM.
- The yaml language feels less pleasant to read and write than Ruby to me,
though practically they both work for my needs.
- I won’t speak to Ansible’s extensibility as I haven’t attempted anything other
than writing roles that use built-in resources.
Even though I feel like I’m accepting a downgrade in all the dimensions listed
above, Ansible is good enough at each of those things that I don’t really miss
the the things I like better about Chef. And the amount of time I spending
fixing or troubleshooting Ansible tooling can be effectively rounded to
zero. This simplicity and reliability more than makes up for the other
tradeoffs.
I now have each of my handful of physical/cloud hosts defined in my Ansible
inventory file and my Docker containers are defined in a role
using docker_image
and
docker_container.
Perhaps someday I’ll migrate to
using Docker Compose but for now
this is working well.
Testing is simple and basic, I have a Vagrantfile that launches one or two
VirtualBox instances and runs whatever role(s) I’m current hacking on them
(including the Docker roles if necessary). Testing a change takes a minute or
two, but things mostly work the first time and when there is a problem the fix
is usually simple and obvious. Even though my feedback cycle is slower with
Ansible, I find that iteration is faster because I’m working on the problem I’m
trying to solve instead of yak-shaving six degrees of separation away.
Conclusion
I miss writing Chef cookbooks, it’s still my favorite configuration management
system. The overhead of maintaining simple things in Chef is just too high,
though, and the power of its ecosystem can’t offset that overhead on small
projects. My life with Ansible and Docker feels messier, but it’s also simpler.
I’ve also come to appreciate that while having a really sophisticated
configuration management and deployment system is great, it does you precious
little good if your management of persistent state across upgrades and
node-replacement isn’t similarly sophisticated. Building images with Dockerfiles
feels like a huge step backward in terms of configuration management
sophistication, but it’s a huge step forward in terms of state management, and
that’s a tradeoff well worth making in many situations.
Introduction
After more than 12 years it’s time to say goodbye to
Wordpress. It’s been a good run and WordPress is
fantastic software but I spend considerably more time maintaining it than I
do writing. A static site can do everything I want and needs way less
maintenance when I’m not using it. I’ve switched over to
Hugo and am relatively happy… though there were some
minor bumps and bruises along the way.
Yearly and Monthly Archives
If you put the year or month in your permalink structure, Wordpress
automatically creates yearly and monthly archive pages. For example, if your
permalink structure is http://example.com/:year:/:month:/:slug:/, you can
visit http://example.com/2017/06/ and see a list of postings from
that month. I’m probably unusual, but I like to navigate sites this way and
I want my site to have reasonable archive pages at those year and month urls.
Hugo can’t yet do this. It’s
relatively straightforward to use Hugo’s templating features to create
a single archive page that links to every post,
but the per-year and per-month urls are important to me.
I wasn’t able to use Hugo to solve this problem, but most webservers do have
the ability to automatically display the contents of a directory, which is
already what Hugo generates. I configured my Caddy webserver to do this and
it works ok. The generated page style is inconsistent with the rest of the
site but Caddy does allow styling those pages if I choose to do so later. More
likely I’ll live with the default style until the Hugo issue is resolved
and then start generating monthly/yearly archives with Hugo.
Extensibility
Hugo is written in the Go programming language, which is a relatively young
language that prominently features static and self-contained binaries. I’m a
huge fan of Go’s static binaries. A large part of the reason I picked Hugo over
Jekyll is ease of installation and upgrade (just
download one binary and run it). But one downside of the self-contained nature
of Go programs is that plugin systems are tricky to create. Hugo doesn’t have
one yet. The lack of a plugin
ecosystem does limit what Hugo can do compared to systems like Jekyll, but
my needs are relatively simple and it hasn’t been a major issue.
Theme Inconsistency
The Hugo theme ecosystem seems immature compared to what I’m used to from the
world of WordPress. WordPress has well-developed conventions for how themes
are configured. In contrast, the Hugo theme ecosystem seems to have few
broadly adopted conventions. Many Hugo themes don’t support every site layout
that Hugo can generate, but instead assume that your site content adopts
a specific category or filesystem layout. These limited/opinionated themes
combined with my ignorance of Hugo’s site-layout conventions to create several
confusing moments when the site rendered with missing content or in other
unexpected ways. Only after reading Hugo’s
site organization docs closely and
poring through theme source code did I come to understand why things weren’t
rendering as expected.
WordPress also has easy to use mechanisms for extending themes via plugins and
widgets. With Hugo, themes themselves are the only mechanism for extending
Hugo’s capabilities. Hugo does allow you to add and override things in your
theme on a file-by-file basis without having to edit the upstream theme
directly, which is relatively powerful but there’s an art to factoring a
theme into easily overridden files and maintenance can be unpleasant
if you end up having to override something in a large/core file in the theme.
If you’re a front-end developer maintaining your own theme, none of this
matters in the least. If you want to do light customization of an existing
theme, minimizing maintenance headache so you can update the upstream theme
easily is a little finicky.
I chose
hugo-theme-bootstrap4-blog
for my theme and have been happy. It has clear documentation about the
content layout it expects, it provides config.toml options for most things I
want to customize, and the maintainer has been responsive to pull requests to
add the features I wanted without my having to keep a fork that deviates from
upstream.
Migration
Thankfully, migrating my data was not terribly difficult. I read
this post on
migrating data from WordPress to Hugo and was able to use a combination of
WordPress’s built-in export-to-xml feature and the
ExitWP tool to convert my WordPress
database to a skeleton Hugo site. I was able to keep my permalink structure
the same, and I was already hosting files and images at static non-WordPressy
URLs that didn’t change. The only url change I found was that I had my RSS
feed at /feed/ and I added a webserver redirect from there to /index.xml
where Hugo puts the feed.
Conclusion
It wasn’t the smoothest migration in the world, and Hugo had a non-trivial
learning curve for me… but I’m happy with the result. Writing posts is
dead-easy and when I’m not writing there’s no maintenance to do.
Ubuntu doesn’t remove old kernels when upgrading to new kernel
versions, which is a great because sometimes there’s a compatibility
problem and you want to roll back. If you don’t pay attention to free
disk space, though, it’s really easy to fill up your boot partition
which is only a couple hundred megs by default. When this happens,
kernel upgrades start failing and apt may start throwing errors for
all package operations, which isn’t fun. It’s relatively
straightforward to recover from, but it happens infrequently enough
that it always takes me too long to remember the details. Next time
I’ll check here:
Find the currently running kernel version, I never uninstall the
currently running kernel in case there are compatibility issues
with newer kernels:
For each older kernel you want to remove:
 sudo dpkg --purge linux-image-x.x.x-xx-generic \
                   linux-image-extra-x.x.x-xx-generic
You can do this with apt-get or aptitude as well, but dpkg is less
likely to run into problems with broken dependencies or
half-configured kernel installs (as is common if you discover this
problem while upgrading your kernel).
I almost always also have kernel headers installed. While they
don’t take up space in /boot, they’re not needed once the old
kernel is removed either. Might as well clean them up as well:
 sudo dpkg --list | grep linux-headers
 sudo dpkg --purge linux-headers-x.x.x-xx \
                   linux-headers-x.x.x-xx-generic
At this point apt-get can probably finish whatever
installs/upgrades were in-flight when this issue started:
apt-get --fix-broken install
Now to set up free disk space monitoring so this doesn’t happen every few months.
Introduction
Chefspec is an incredibly
useful tool for testing Chef cookbooks. It’s much much faster than
running chef on a real node, but it can provide you much of the
testing feedback you’d get from a real chef run. Verious.com has a
nice introduction to chefspec if you’re not already familiar with it.
What makes chefspec so fast is that it doesn’t perform a full chef
run. It loads Chef with your cookbooks and modifies them in-memory so
that they merely send messages to Chefspec instead of performing real
system changes. It does this primarily
by
stubbing Chef’s
Resource class. In Chef,
just about every way to manipulate system state is a resource. Most of
them have excellent metadata about the actions they will perform
(files have filename attributes, packages have package names) and they
all share common methods for executing the work, so it’s surprisingly
straightforward for Chefspec to stub the “doing work” part so it
performs no action, while retaining the ability to effectively test
for what would have been done.
Execute Blocks
This process is nothing short of amazing for Chef built-in resources
like files, templates, packages, etc. It’s fast, it’s accurate
(excepting bugs in core Chef that result in unexpected actions due to
the “doing work” code), and it’s simple to use. But it does have
limits. A good chunk of Chef’s flexibility comes from the ability to
run custom code in execute blocks and ruby blocks:
execute "thing1" do
  command "rm -rf /"
end
execute "thing2"; do
  command "find / -print0 | perl -0ne unlink"
end
execute "thing3" do
  command "python -c \"import shutil; shutil.rmtree('/')\"";
end
Chefspec is pretty limited in what it can tell you about execute
blocks. There’s no way it can know that the 3 execute blocks above all
do the same thing (delete the root filesystem), or that it’s not safe
to run those commands on your development workstation. Out of the box,
it’s largely limited to
testing
whether or not the execute block is called.
Guards
But even reliably determining if an execute block will run is not
trivial. The not_if and only_if guards used to determine whether the
block runs present similar problems to the execute block itself:
execute "create_database_schema" do
  command "mysql -u user -p password dbname > create_schema.sql";
  not_if "echo 'show tables;' | mysql -u user -p password dbname | grep tablename"
end
The not_if guard above will give unexpected results if the mysql
binary is missing from the system where you run chefspec. Chefspec 2.x
sidestepped the issue. It didn’t execute guards by default, and simply
assumed that the execute block itself would always run… not
ideal. Chefspec 3 does inspect the guards, but rather than executing
the commands inside of them, it raises an error requiring you to stub
it yourself like so:
it "Creates the Database Schema when needed" do
  stub_command("echo 'show tables;' | mysql -u user -p password dbname | grep tablename").and_return(false)
  expect(chef_run).to run_execute('create_database_schema')
end
it "Doesn't create the Database Schema when it already exists" do
  stub_command("echo 'show tables;' | mysql -u user -p password dbname | grep tablename").and_return(true)
  expect(chef_run).to_not run_execute('create_database_schema')
end
This is a pretty clean example. In practice, guards frequently contain
wacky stuff. It’s not unusual to leverage a couple shell commands and
do some ruby transformations on the resulting complex data type,
possibly requiring several stub classes to stub a single guard. If you
include several upstream cookbooks, you may have a substantial amount
of stubbing ahead of you before chefspec 3 will run cleanly.
Test Coverage
The Chefspec 3 convention of encouraging the stubbing of not_if and
only_if guards results in covering more of your Chef code with unit
tests, and that’s a great thing. It comes with a non-trivial cost,
though. Having to stub the code in included cookbooks in order to test
your own code isn’t fun. With chefspec 2.x, I accepted a very low
level of code coverage from chefspec, using it only to test
“well-behaved” resources that required little to no stubbing. My
complete testing workflow looks like this:
- Syntax and style testing with Rubocop.
- Chef syntax checking with knife cookbook test
- Fast low-coverage unit tests with chefspec
- Slow, high-coverage integration tests with minispec-handler
(either via Vagrant provision while I’m hacking or test-kitchen in
Jenkins/Travis)
Because the integration environment that Chef works is in so much more
complex than most (non-infrastructure-automation) code, I prefer to
invest in having a strong integration test suite in minitest-handler
rather than spending a lot of time stubbing and mocking in chefspec. I
still want to use Chefspec to catch low-hanging fruit because my
integration tests are very slow by comparison, but I’m willing to
accept a relatively low level of unit-test coverage. If I was doing
lots of LWRP development or otherwise had to test very complex logic
in Chef, I’d need stronger unit testing, but 90% of my Chef code is
straightforward attributes, resources, and includes so integration
testing is where a lot of my bugs are easiest to find.
Skipping Guard Evaluation
Which is a round about way of saying, I like the chefspec 2.x behavior
of skipping guard evaluation. It results in a less robust unit-test
suite, but I make up for it with my integration tests. If you prefer
the same tradeoff, you can get the old behavior back by stubbing
Chef’s resource class yourself:
require 'chefspec'
describe 'example_recipe' do
  let (:chef_run) { ChefSpec::Runner.new(platform:'ubuntu', version:'12.04').converge 'example_cookbook::example_recipe' }
  before(:each) do
    # Stub out guards so that execute blocks always "run"
    Chef::Resource::Execute.any_instance.stub(:should_skip?).and_return(true)
  end
  it 'Creates the database schema' do
    expect(chef_run).to run_execute('create_database_schema')
  end
end